The core idea behind MyDataNinja’s creation is to empower companies by consolidating all essential functionalities into a single platform specifically designed for advertising needs. MyDataNinja streamlines the management of multiple advertising accounts, enhancing the efficiency of digital advertising through automation and real-time data analysis, enabling faster and more informed decision-making processes.
The significance of real-time data in advertising cannot be overstated. Many companies currently handle this task manually, typically on a weekly basis (in an optimal scenario), resulting in data inaccuracies, delayed information, and consequently, delayed decisions. MyDataNinja easily resolves these challenges. It provides instantaneous information on each advertisement’s profitability, precise ROI, and revenue, enabling swift identification and deactivation of underperforming ads. This not only optimizes budget spending but also has the potential to double or more the results by reallocating funds to high-performing advertisements.
Prior to diving into data analysis and decision-making, it’s crucial to ensure the system is configured properly and thoroughly understand its functionalities.
This article offers a comprehensive step-by-step guide, starting from account creation to proficient usage of the MyDataNinja platform.
Account creation in MyDataNinja
First step, obviously is account creation in MyDataNinja.

When you register, you’ll encounter a concise setup wizard prompting you to complete a questionnaire detailing your company’s specifics and how you intend to utilize the platform.
Operating on workspace levels, the system offers the flexibility to select plans and make payments specific to each workspace. Users can manage multiple workspaces individually, akin to distinct projects or companies, aligning with their preferred organizational structure. Each workspace operates within its designated plan and limitations, for which you’re responsible. Additionally, advertising accounts are linked to these workspaces.
The subsequent step in the wizard involves connecting your accounts. MyDataNinja primarily assists companies in digital advertising and analytics, emphasizing the importance of integrating advertising accounts into the platform. Currently, the system exclusively supports Google and Meta Advertising platforms. Thus, you can only attach accounts from these networks.
Upon initiating the connection process, the system will display all accessible accounts within the network. Following this, you’ll need to activate precisely those accounts you wish to connect within this specific Workspace.
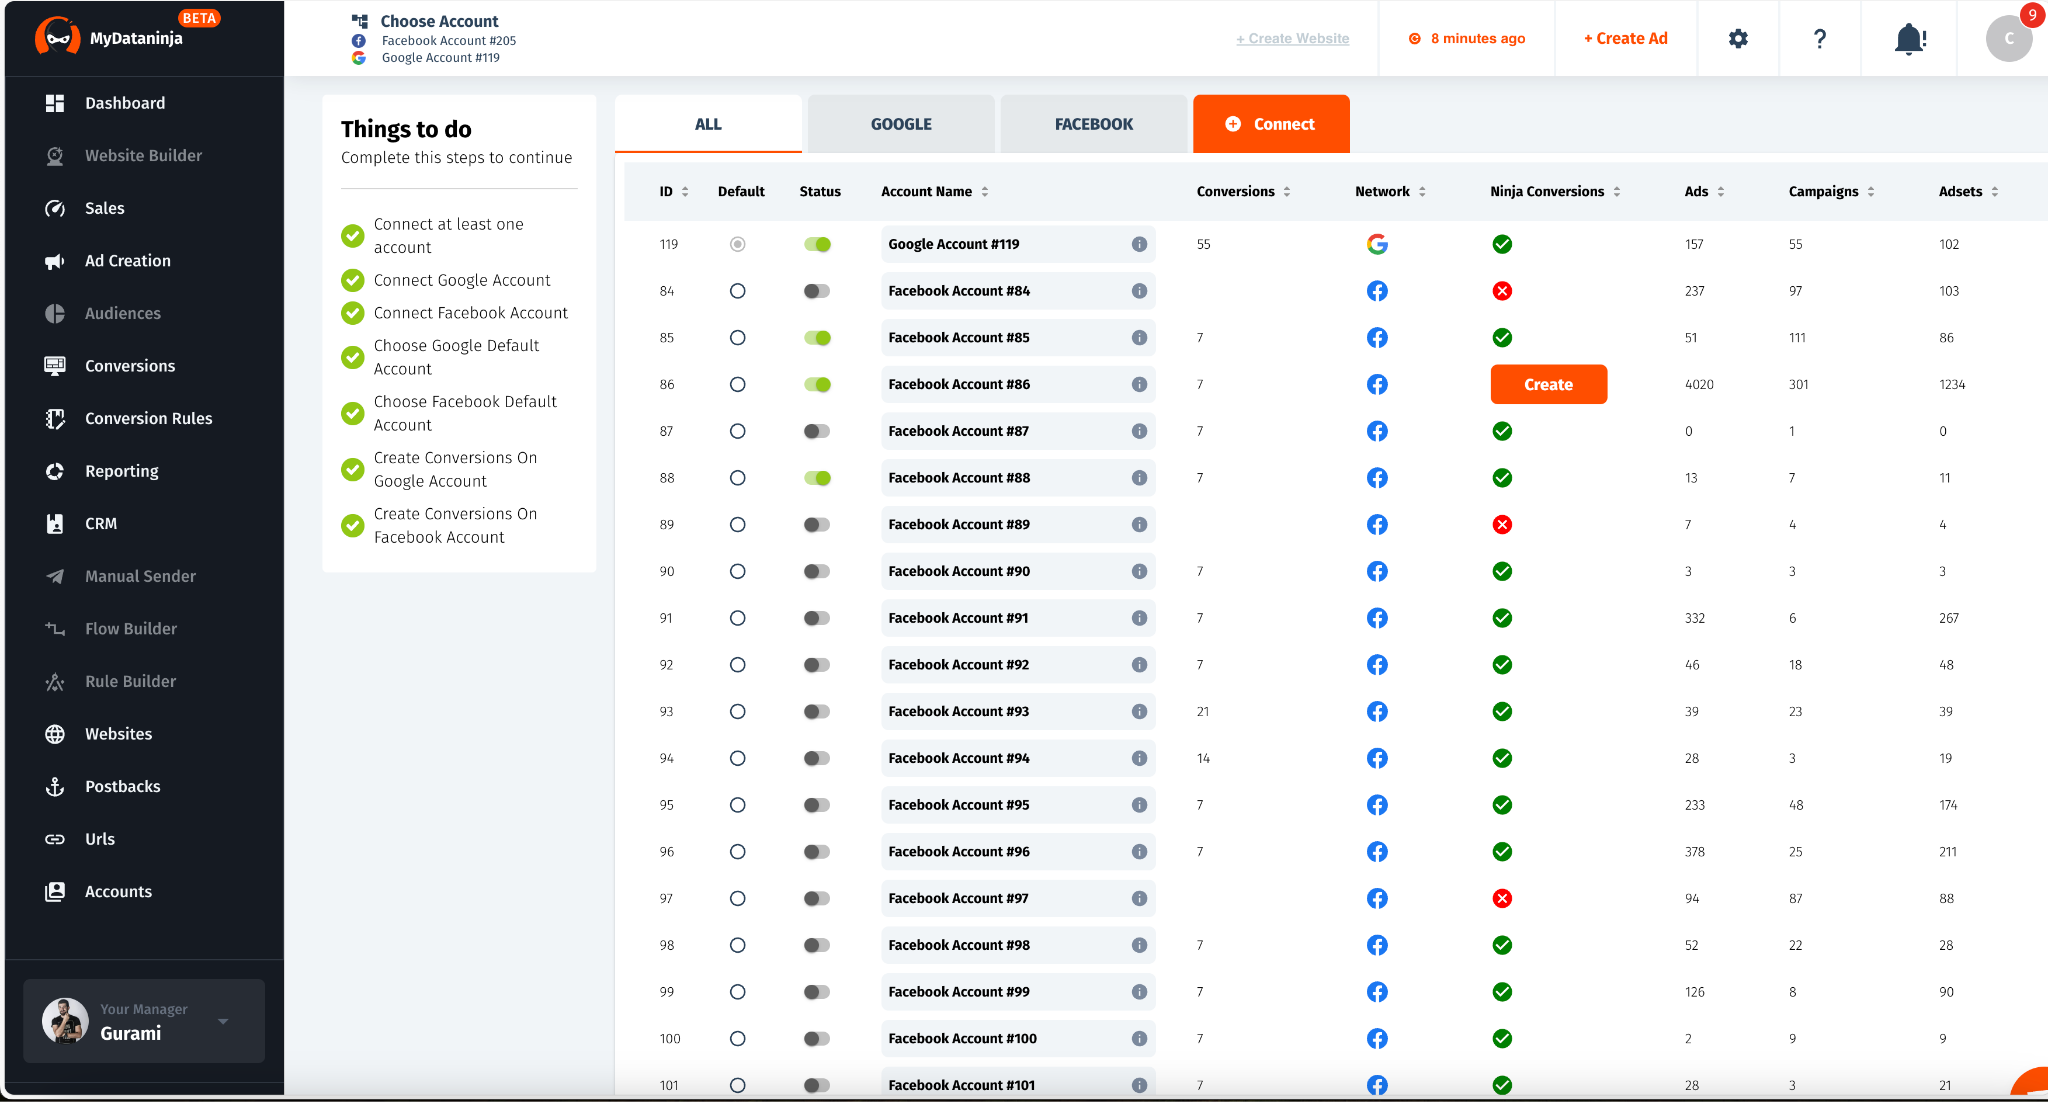
Here, you’ll find two key features:
- Account Switcher: Easily toggle accounts on or off. Simply select and activate the accounts you wish to connect to this specific Workspace. Activated accounts will be retrieved by MyDataNinja, and their associated costs will appear in the Ninja Reports within an hour at the latest.
- Ninja Conversions: For Facebook, it verifies pixel connections in accounts. If absent, you’ll be prompted to click the “Create” button to generate a pixel. The Meta Pixel is crucial for user tracking, enhancing advertising effectiveness. In the case of Google Ads, it checks for “Imported Conversions” in the account. If absent, it creates “DataNinja Purchase” and “DataNinja Lead” conversions as “Imported Conversions.” These conversions are utilized to transmit sales data and execute CPA (Conversion-Per-Acquisition) advertising campaigns in Google.
Maximizing Your Ad Performance: Revenue Data Selection and Tracking
After successfully connecting your accounts, you’ve achieved a significant milestone. The platform will automatically retrieve cost data for your advertisements from all the ad accounts that were activated and linked to the workspace.
Following this milestone, the next crucial step is choosing how you prefer to access revenue data. To assess the ROI per advertisement and determine profitable versus ineffective ads, having both revenue and cost data is essential.
There are two ways to select how you view Revenue Data, which you can modify using the TopBar select button:
- Revenue Data from Ad Networks
- Revenue Data from Ninja CRM

If your CRM is already linked to Google Ads and/or Meta Ads, seamlessly sending revenue data to these platforms, and you aim to use MyDataNinja as a unified reporting and dashboard system, opt for “Revenue Data from Ad Networks.” This option fetches revenue from the networks and generates reports based on this data.
However, if you wish to utilize MyDataNinja to its fullest potential, leveraging our Pixel Tracking and Attribution capabilities, you’ll need to follow a tutorial and comprehend how to achieve this integration.
The benefits of using our system for tracking and revenue data are substantial. For instance, if you transmit sales data from CRM to networks and a sale gets canceled in the CRM later, the revenue in the Ad Network often remains unchanged, despite the cancellation. Consequently, your actual revenue decreases, rendering some advertisements unprofitable. MyDataNinja, along with its Tracking/CRM features, offers a solution to avoid such discrepancies. It calculates revenue based on real-time statuses of all orders, ensuring that revenue numbers reflect real-time data (given correct integrations and usage).
Special Pixel for That Website
The subsequent step involves adding your website to generate a specialized Pixel for it.
Once the Pixel is generated, you’ll need to embed it on your website and confirm that the connection is established and functional.

Our Pixel serves as a container, granting you the flexibility to select which Meta Pixels and Google Gtags load simultaneously with our Pixel. This process is entirely asynchronous, eliminating concerns about load time.
By utilizing Gtag and Meta Pixels from our platform, you can efficiently gather audiences within your Advertising accounts, simplifying Remarketing and Retargeting strategies.
Upon integrating the Ninja Pixel into your website, it initiates tracking every user who visits the site, notably identifying the source of their visit, particularly the advertisement they clicked on. This tracking aspect is pivotal as it allows us to discern the effectiveness of various advertisements by understanding the user’s origin and the profit they generate.
Understanding Ad Attribution and Unique URL Tracking for Effective Campaign Analysis
Let’s begin by discussing how the pixel tracks which advertisements attract users. To achieve this, it’s essential that each URL used in an advertisement contains a unique NJID. There are two methods to accomplish this:
- Custom URL Tracker: This feature allows you to input a URL, and in return, it generates a unique URL that should be utilized in Google or Facebook ads.

Each URL must be used exclusively in a single ad. It needs to be unique for each ad so that the pixel can differentiate and accurately determine the advertisement’s origin for each user. There’s no need to worry about associating the URL with the network or advertisement.
Our system will automatically synchronize Meta and Google Ads accounts, identify the URL used in your advertisements, and independently connect the URL to the Advertisement, Ad Group, and Campaign. It’s a fully automated process.

An interesting aspect is that if you opt to use this URL in SMS, email, or any other platform solely for tracking its results, our system will still monitor it, though it won’t be associated with any specific advertisement. These URLs are referred to as Organic URLs, and their performance reports, separate from those used in Google or Facebook ads, are available on the Reporting page.
Instead of utilizing short URL trackers that only display clicks and impressions, we offer a solution that enables tracking not just clicks but also leads, sales, and revenue from both short and regular URLs.

As previously mentioned, you’ll notice the ‘njid’ parameter, which serves as a unique identifier to track each advertisement.
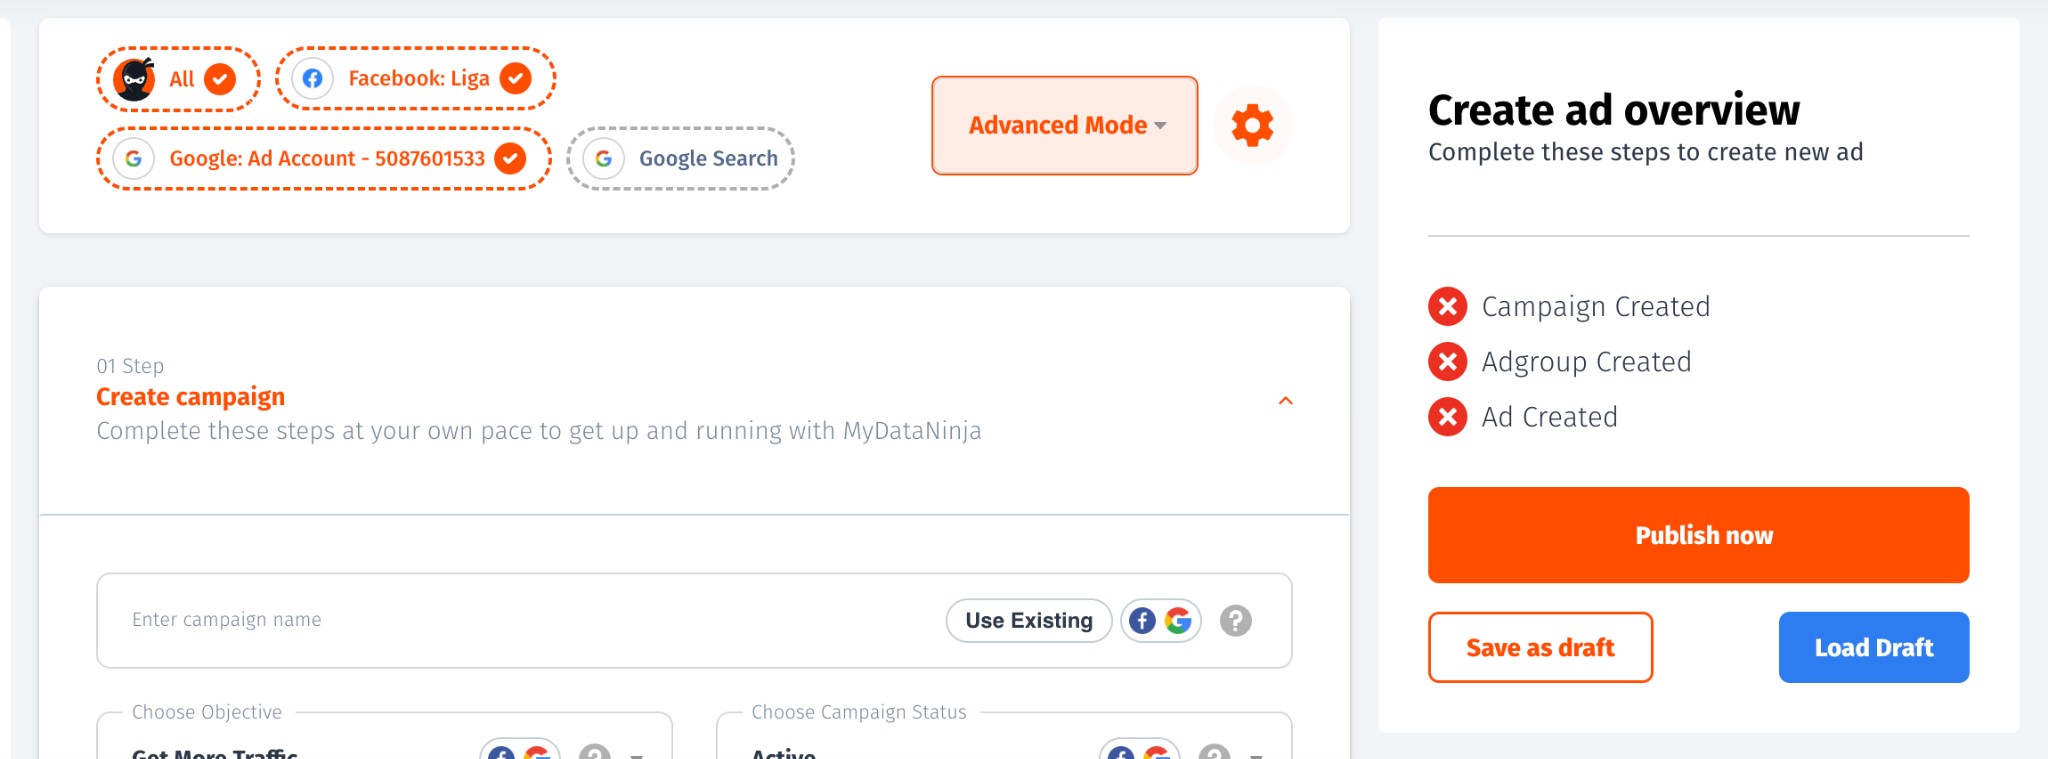
2. Another way to create URLs with the unique Njid automatically is by using the Ninja Ad Creation Module.
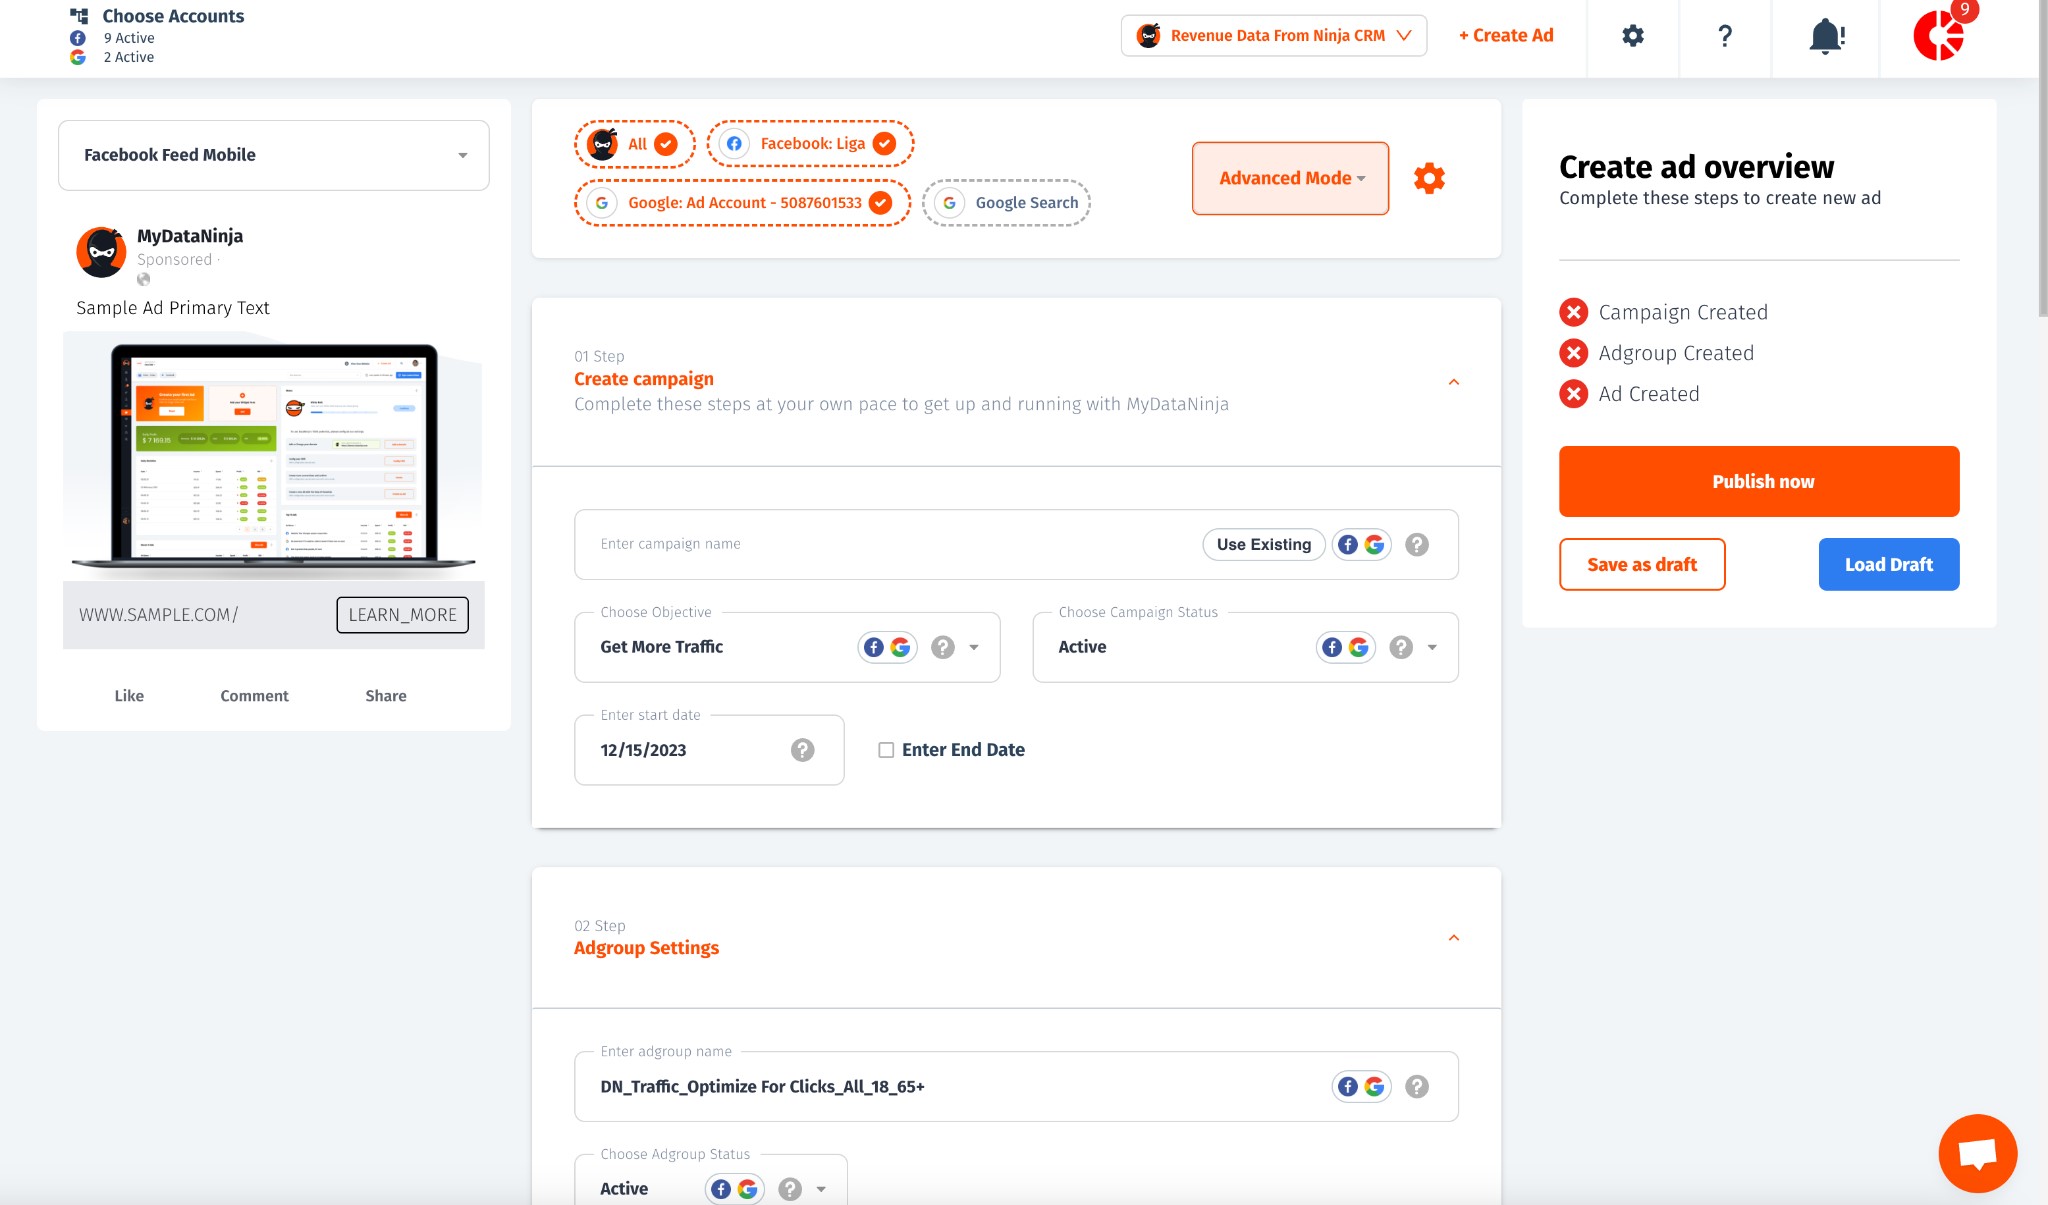
This is one of the coolest features we’ve developed. With the Ad Creation Module, you can effortlessly select accounts to create advertisements directly from MyDataNinja across multiple platforms. Currently, we support:
- Google Display Ads
- Google Search Ads
- Facebook Ads
- Instagram Ads
The great thing is that you can create ads on Google and Facebook by filling out just one form. No need to create separate advertisements on these different platforms. When launched simultaneously, this creates Normal Video or Banner ads on Meta platforms and Display ads on Google. You can select placement options to choose which platforms to target. This feature is a huge time-saver for ad creation.
Switching between accounts is simple too, allowing you to submit ads across multiple accounts quickly and easily. Simply click on the Gear icon and choose the accounts for ad submission.
I won’t delve too deeply into the Ad Creation Module here, as it’s still in development with more functions underway. However, let’s focus on what’s already available. Once an ad is submitted to networks using this Module, you don’t need to worry about the Njid parameter or anything else. It automatically adds the necessary parameters to URLs and connects the advertisement to the system. It’s all automated for your convenience.
Note that the Ad Creation module currently offers only a few Objective types: Traffic and Conversions. We’ll soon add Lead forms and other ad types, along with more networks, enabling simultaneous ad submission across multiple networks. Stay tuned for updates on this exciting development.
Understanding User Tracking and Revenue Attribution
After a brief overview of pixel tracking and the Njid parameter, you should now have a basic understanding of how we track every user and associate them with specific advertisements. Through this method, based on “Last Click Attribution,” we precisely identify the user’s origin from each advertisement. With costs data already available per advertisement, understanding the complete picture requires revenue data associated with these users.
That’s why there are multiple ways to provide the system with information regarding Revenue:
- Utilizing our CRM module
- Integrating and connecting your CRM to our CRM Module
- Implementing Postbacks
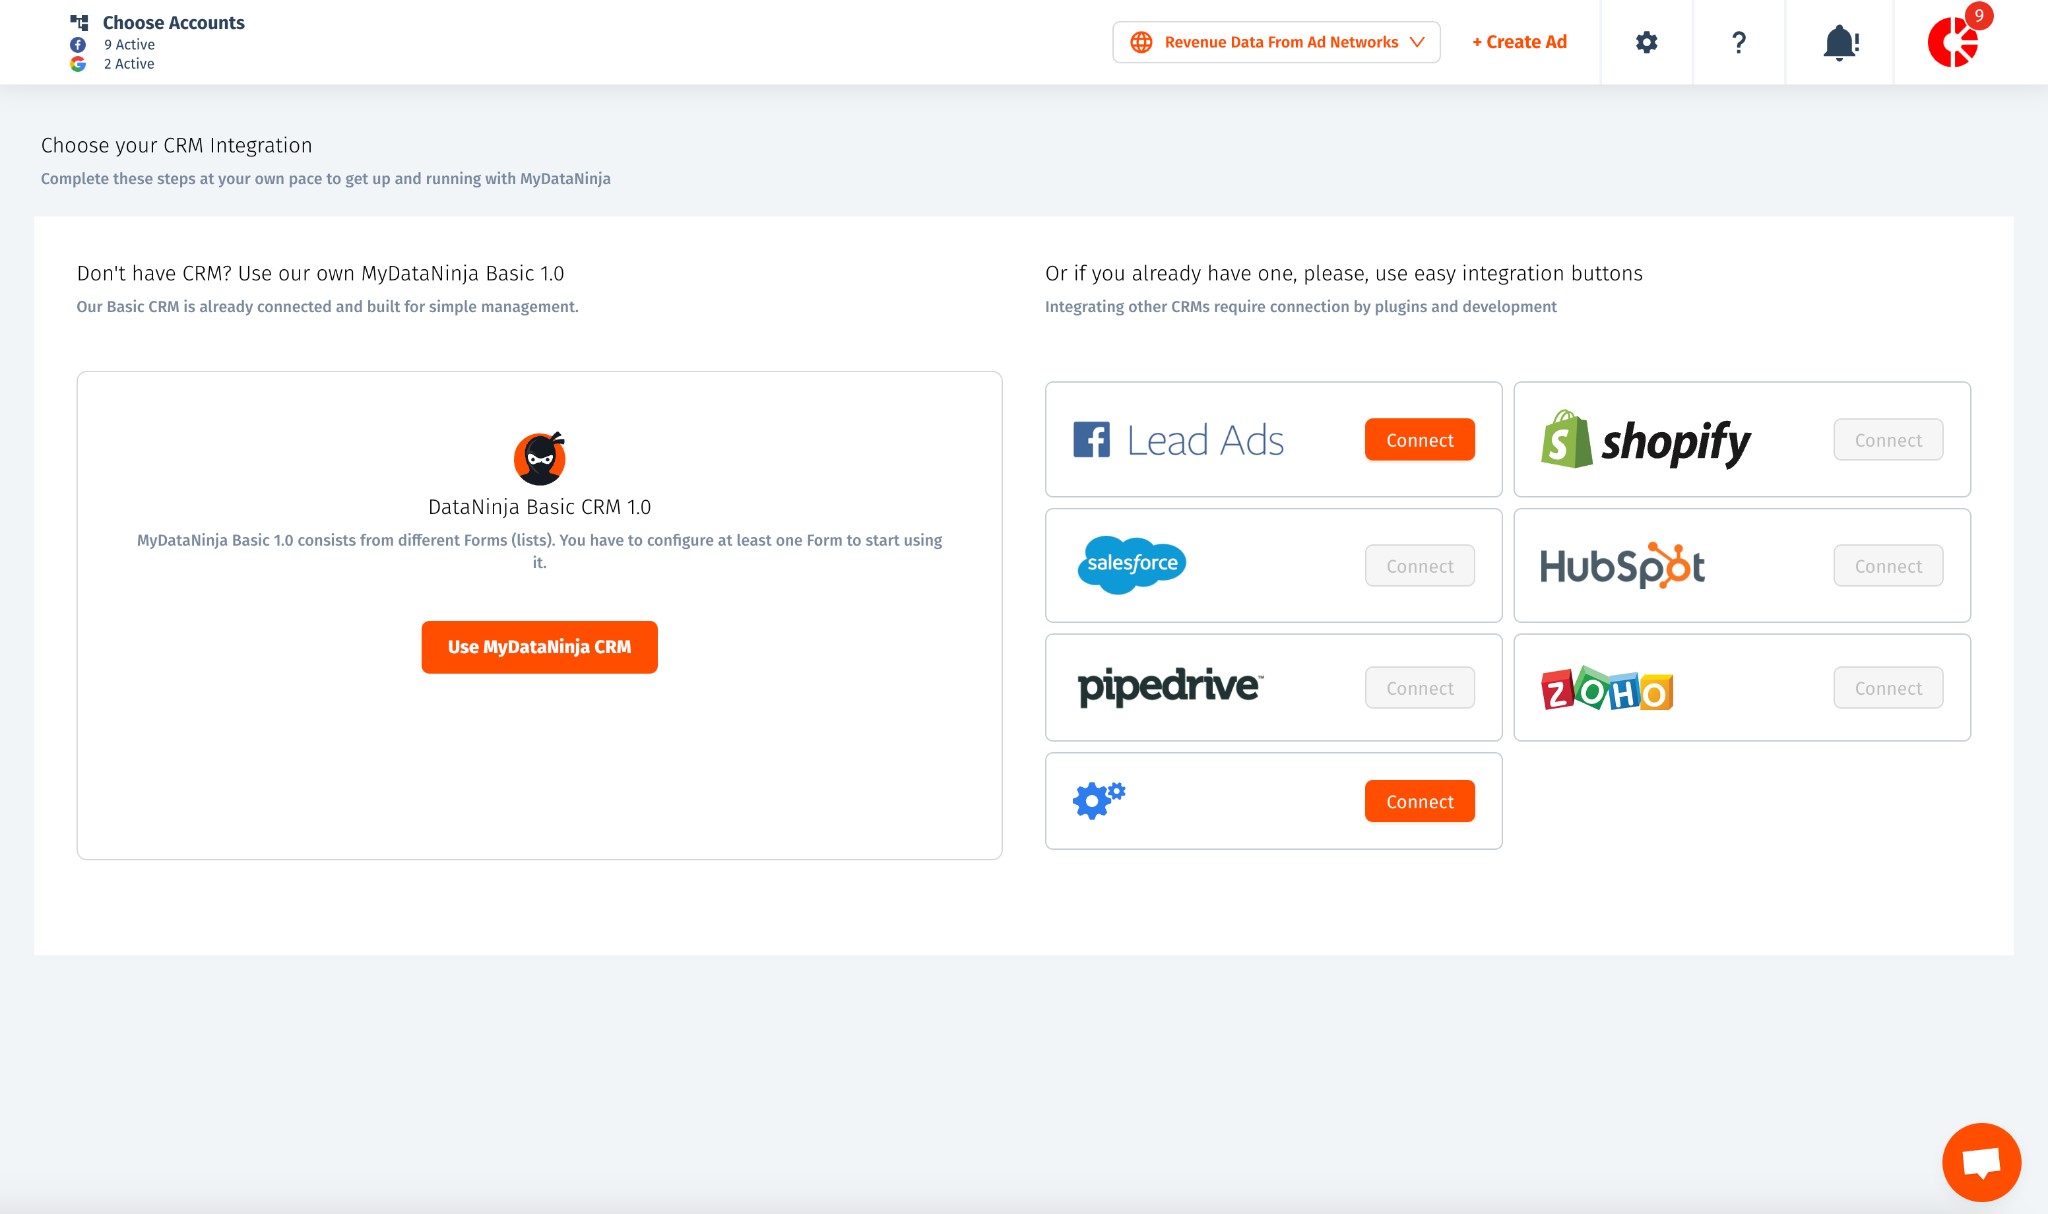
CRM Integration and Revenue Tracking Methods
If you’re seeking an easy CRM solution with pre-connected and tracked customized forms, it’s simpler to utilize our proprietary CRM module, which we refer to as MyDataNinja Basic CRM 1.0. I’ll provide a separate blog post explaining its functionality. Additionally, our CRM integration offers the option to automatically retrieve Facebook Leads, streamlining your workflow.
As for other platforms, we are currently working on facilitating seamless connections with various CMS and CRMs, making system integration effortless. However, at present, if you intend to integrate your own CRM system, you’ll need to connect it to our CRM via API.
If you require assistance with this integration, please inform our support team, and we’ll provide all the necessary help.
Postbacks present another avenue to acquire revenue information within our platform. To utilize this method, you’ll need to create an Incoming Postback and provide the URL to your partner.
For accurate Postback tracking, acquiring eventid or userid values through the Postback is essential. For further information on Postback integrations, you can find more details here: Start Tracking.

Simplified Methods for Revenue Data Integration in MyDataNinja
In summary, MyDataNinja requires user revenue data. If you’re utilizing our CRM and forms, the setup process is straightforward.
For those interested in using our CRM linked to their website, we offer assistance by providing a small JavaScript snippet. The setup requires minimal development to connect our CRM with your website form.
If you’re using your own CRM and wish to integrate it with MyDataNinja, the data can be directed to our CRM, possibly hashed, including only user IDs or according to your preferred configuration. To establish this connection, you’ll need to connect via API, unless there’s an easy integration available for your system. Refer to our documentation or contact our support for guidance. While integration is relatively easy, some development work might be required.
If you’re utilizing postbacks, obtaining data through your postback URL is also quite straightforward.
Once sales data is obtained, it appears as follows:
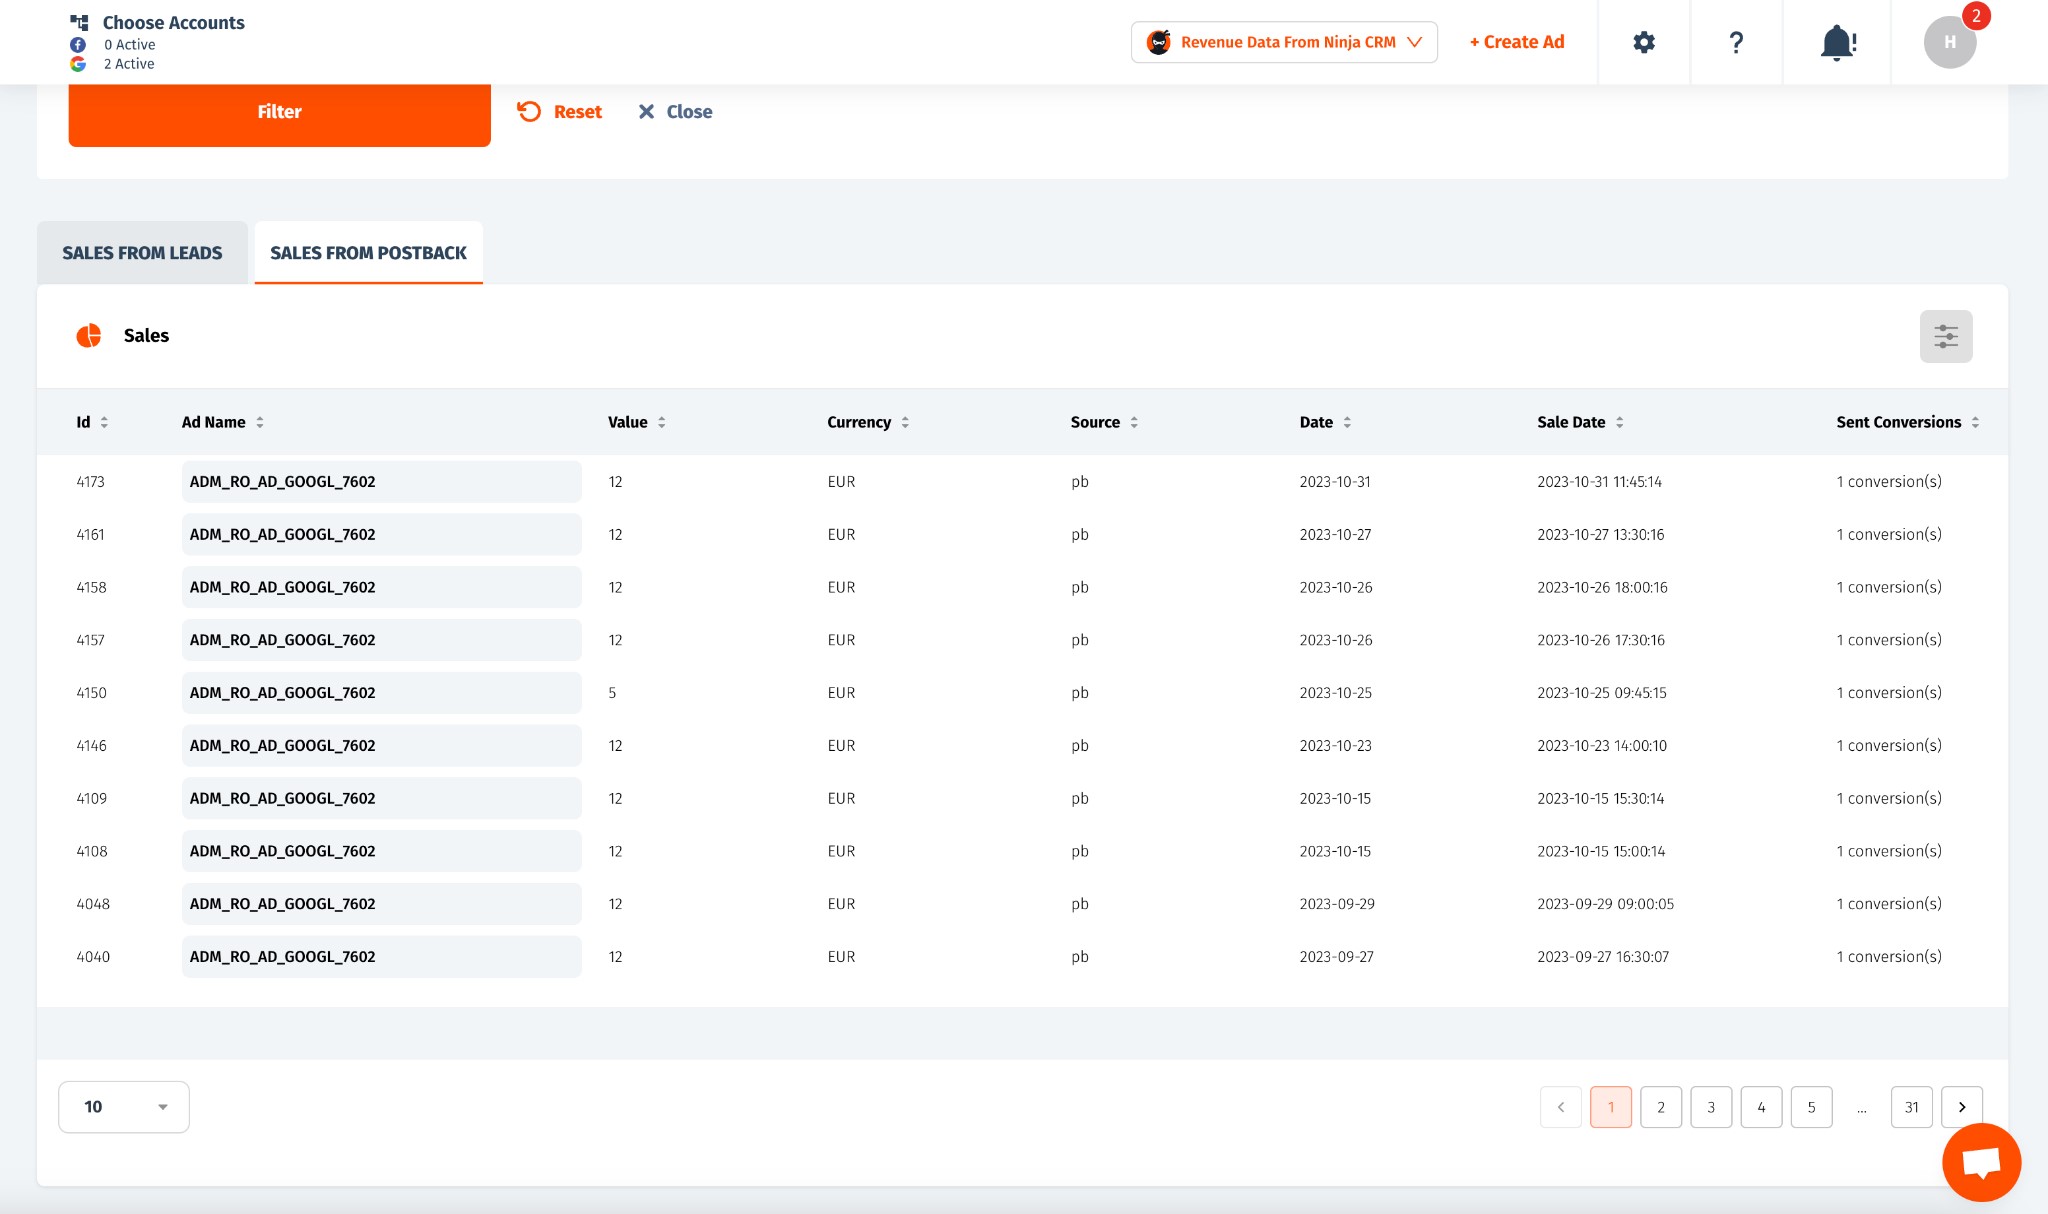
Each sale is linked to an advertisement, and there is also information indicating whether this sale has been reported or sent to Google or Meta through Conversions API integration with the advertising platforms.
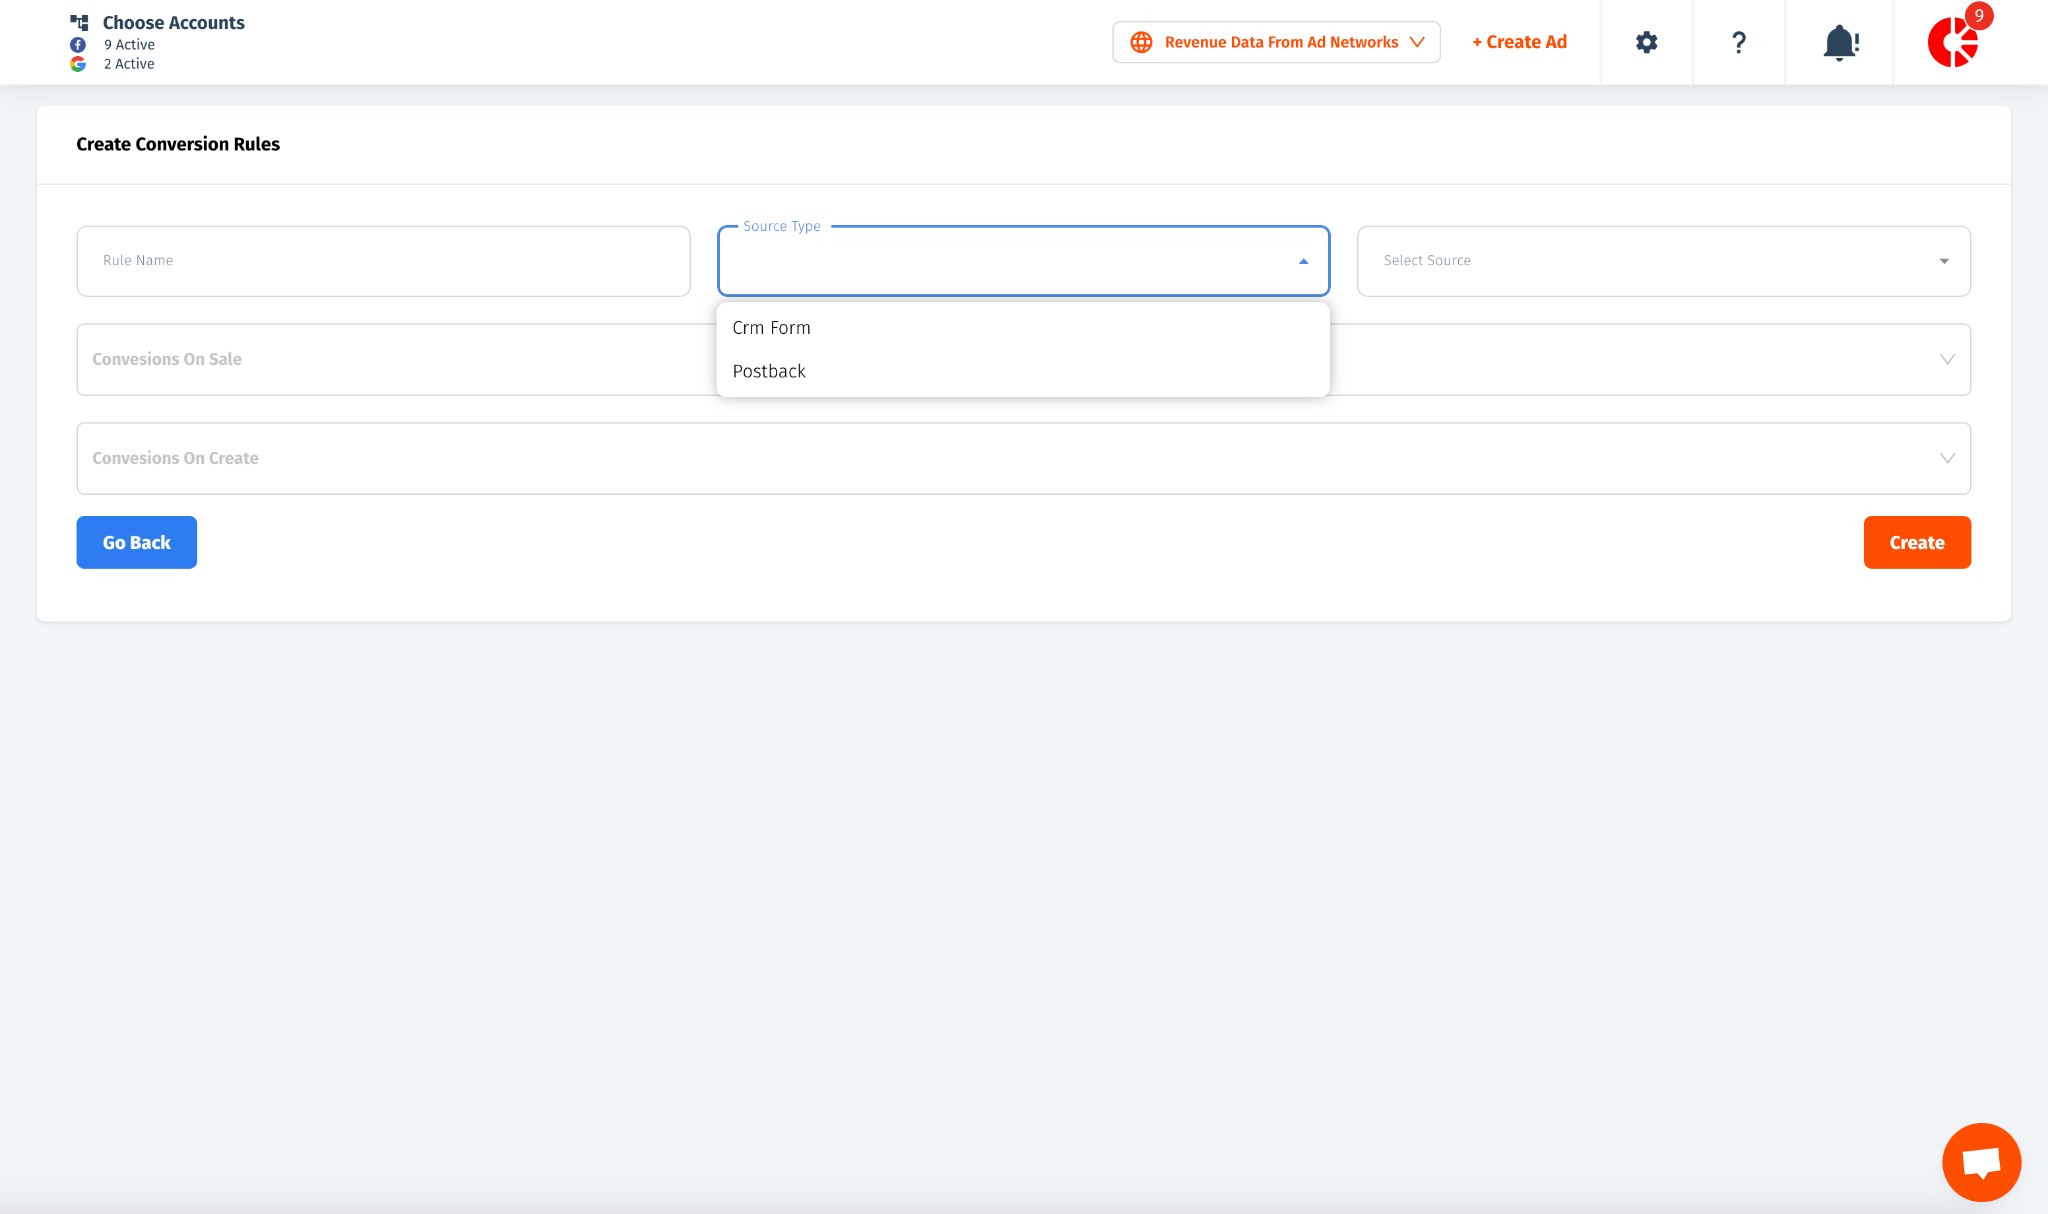
Server Side API Conversions for Google and Meta
Setting up Server Side API Conversions to automatically send data to Google and Meta involves navigating to the Conversions Rules menu and creating a Rule specifying which conversion occurs upon what action. This process is straightforward and simple. Our Tracker captures client identification from Google and Meta, ensuring that even if a user leaves the website without a Pixel-triggered conversion, our Server Side API integration automatically transmits the sale details to the advertising networks.
Why is this process important?
Following iOS14 changes, pixel tracking and cookie-based tracking have become less reliable. To provide algorithms with accurate data about the type of users converting into customers, sending Server Side information has become crucial. Tracking users whose purchases occur days after their website visits involves intricate tech development. But fret not, MyDataNinja resolves this issue. Now, launching CPA-based campaigns becomes easy, enabling you to harness the full potential of machine learning and algorithms.
Finally!!!
Optimizing Advertising Efforts with MyDataNinja’s Comprehensive Reporting and Future Developments
Discover a suite of powerful features tailored to streamline your advertising efforts. From comprehensive Bird-Eye Reports consolidating crucial data to effortless ad duplication with a single click, our platform empowers efficient management across multiple accounts. Delve into detailed reporting for each ad group, optimizing strategies and maximizing your advertising impact effortlessly.
- Bird-Eye Reports: Uncover Comprehensive Insights: Explore the Bird Eye Report in our Reporting section, offering a consolidated view of essential data from multiple accounts. Easily manage Ads, Ad Groups, or Campaigns across various Networks or Accounts and take prompt actions like turning them off. Save time and budgets by redirecting resources from underperforming ads to successful ones, maximizing advertising efficiency effortlessly.
- Detailed Reporting for Each Ad Group: Dive into detailed reporting for each ad group, providing vital data analyses based on demographics and other essential metrics.
- Effortless Ad Duplication: Use our duplication function for hassle-free ad replication with just one click from Ninja on Meta. No need to navigate across accounts for ad duplication. It’s all about working smarter, not harder!

As for our upcoming developments:
Enhanced Shopify Integration and Automation: Anticipate forthcoming features enabling seamless integration with Shopify and automation functionalities. Prepare for a significant workflow enhancement!